
30th December 2021 (was 107, NOW 463 days to go)
THIS IS YORK for York Show 2022 2023
Confucious when he wrote ‘May you live in interesting times’ had clearly not lived through a pandemic!
So many things haven’t happened as planned since March 2020 and, I’m afraid, ‘THIS IS YORK for York Show 2022‘ now has to be added to this long list. As of today, it has become THIS IS YORK for York Show 2022 2023
It was always an optimistic (some said foolish) plan to attempt to build a layout of this size and complexity to an exhibitable state in around 16 months. And so it has proved.
As is always the case, everything has taken longer than expected but also, as a result of Covid as much as anything else, considerably less time has been available to spend on the layout than was anticpated and this has led over the past couple of months to the inevitable conclusion that there simply wasn’t going to be time to get done everything that needed doing before Easter 2022.
A quick chat with Ken Gibbons (the late Mal Scrimshaw’s successor as York Show manager) a few weeks ago rearranged ‘This is York”s exhibiton debut from Easter 2022 to Easter 2023 and, now the decision is made, it is a considerable relief.
On reflection, I’d far rather do it well than do it quickly and progress will continue to be reported here as and when there’s something worth reporting.
Wishing everyone the very best for 2022.
A photo update will follow in the next few days……
14th November 2021 (153 days to go)
This weekend has been a key moment in the gestation of ‘This is York’ – putting together the baseboard and the etched roof sections with two key questions:
- Will they fit?
- Will it look as I imagined/hoped it would?
Given that this is the culmination of work that has taken up most of my modelling time this year the prospect of doing this was quite exciting and decidedly tense at one and the same time.
So……how did it go?
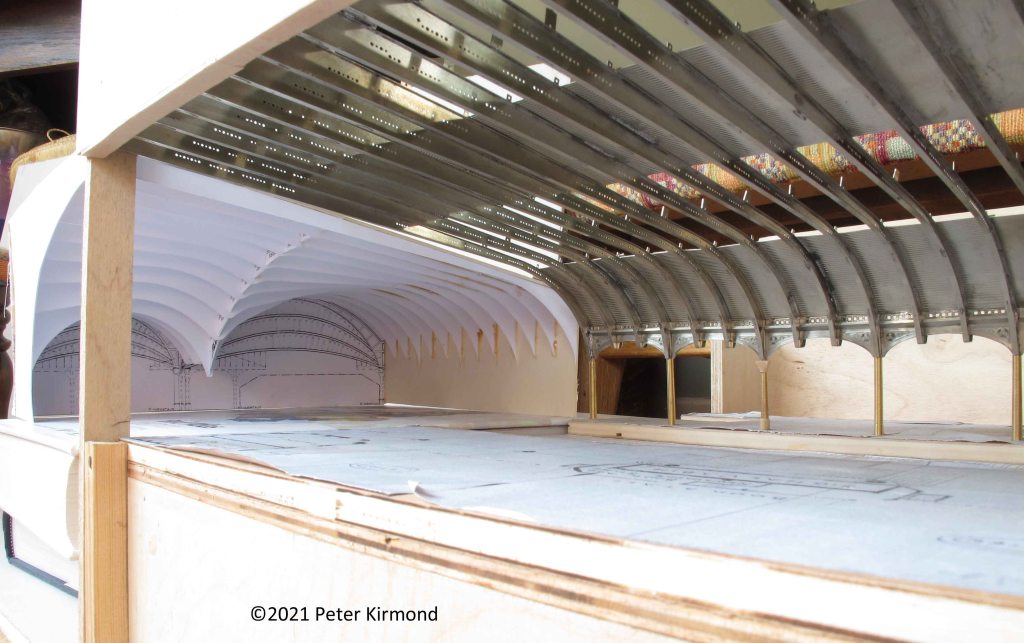
Day 1: fit the 9 sections of roof previously mounted on the test section of baseboard:

On the whole pretty good – one or two minor adjustments needed but nothing too serious or catastrophic.
Days 2 & 3: gradually adding on 15 more roof sections (each one consisting of three cross beams – all that soldering!).
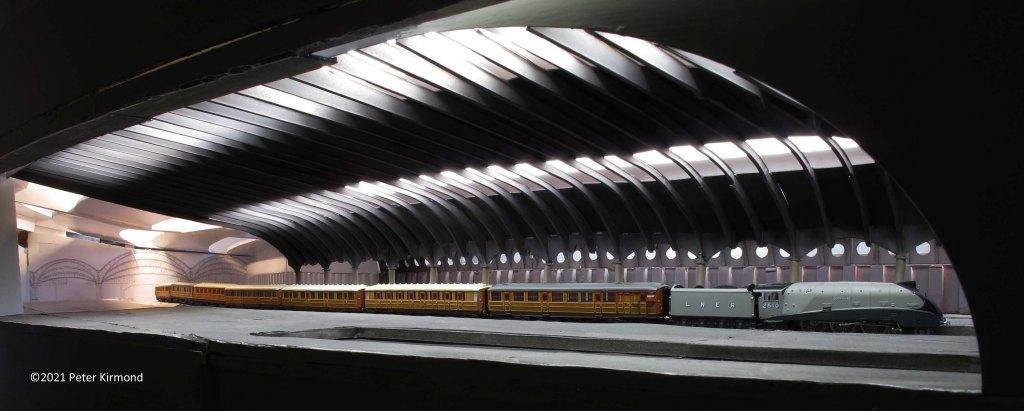
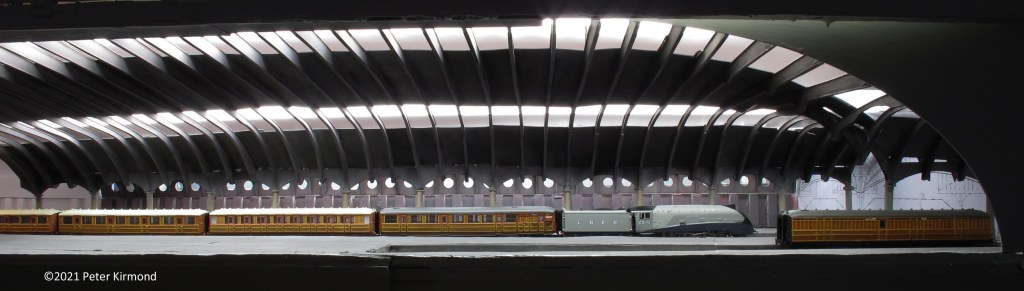
I am well chuffed! Here’s what the final position at the end of the 3 day event looks like:

This leaves the 4 column section of taper at this end to build and then the back wall (oh, and everything else that remains to be done!).
5th November 2021 (162 days to go)
The rake of Barnums is approaching completion – two of the seven seen here:

These are Recreation 21 3D print bodies from Shapeways, 2mm Association Midland bogies adapted to make them a bit more Great Central in appearance and scratchbuilt/custom etched everything else:

They still need door handles, interiors, couplings and corridor connectors plus the brakes need the characteristic grills they had over the windows but I’m quite pleased with how they’re turning out:
5th November 2021 (162 days to go)

They were a fairly common sight at York up to the late 30s passing through on excursion workings from the midlands to various Yorkshire east coast resorts.
31st October 2021 (167 days to do)
How can it be over TWO MONTHS since I last posted on this thread?
People must be wondering what has happened and be waiting patiently (or perhaps incrreasingly less patiently) for an update.
I can cite two reasons for this lengthy gap:
- Everything takes longer than anticipated – many are the jobs you think will take an hour and take all day, few are the ones that you think will take all day but only take an hour.
- LIFE gets in the way of modelling. This has been happening a lot recently in the Kirmond household. Sometimes it’s because good and positive things happen e.g. going to see our daughter who lives in Munich for the first time in nearly two years. All too often it’s because something less than positive is going on (examples too many and tedious to relate).
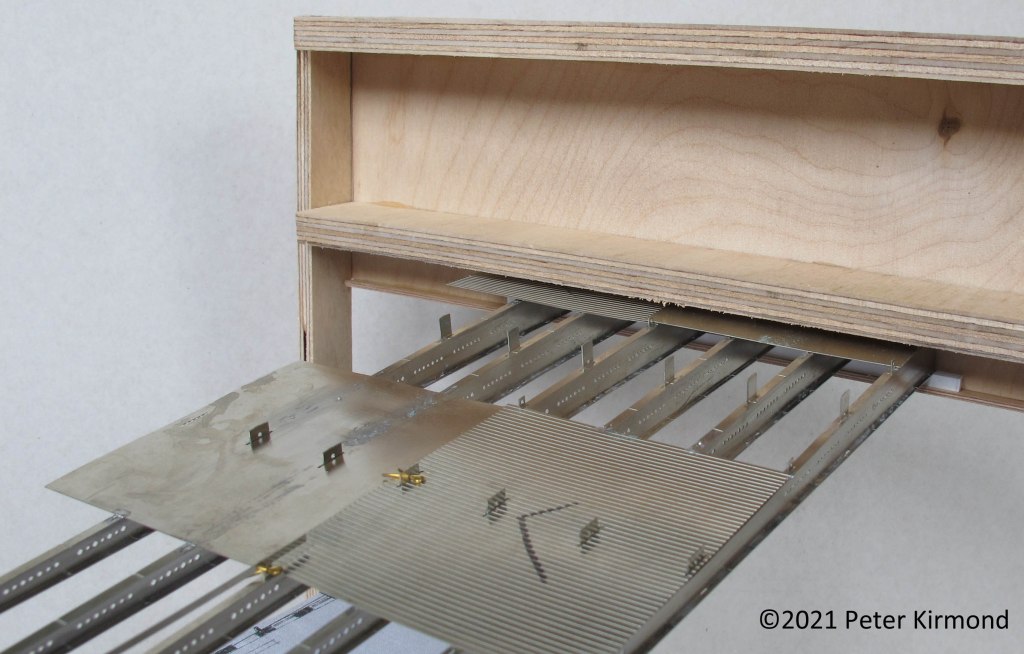
BUT, I can report progress has been made. First of all, the main baseboard for the station roofed area is taking shape:
- A flat surface is absolutely crucial to good baseboard assembly and the flattest surface in our house is the peninsula worktop in the kitchen – a takeaway only catering service was provided during this stage of construction with the actual surface protected with a layer on lining paper!
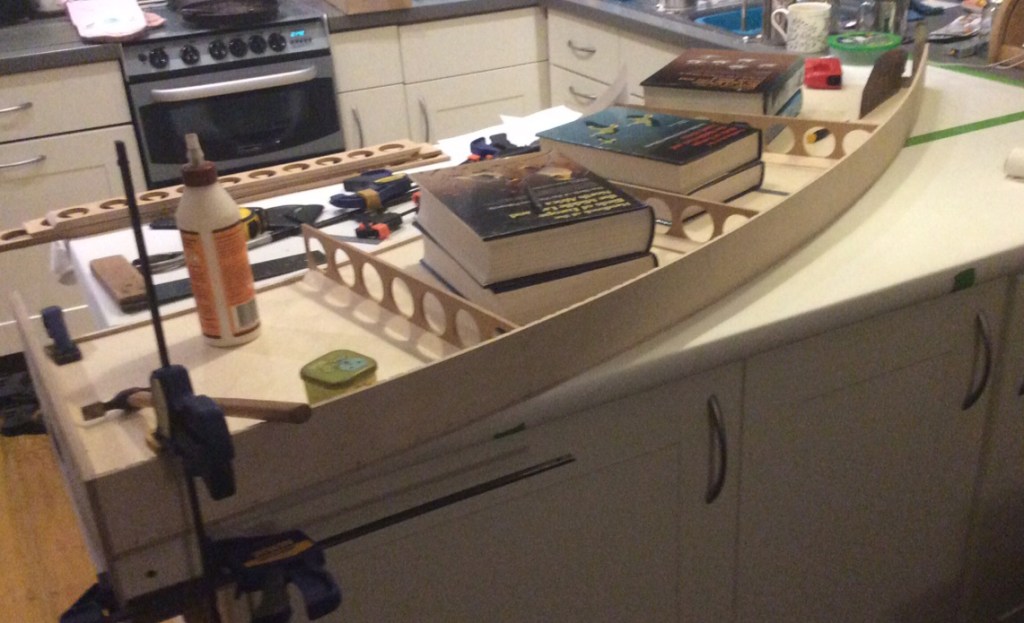
- Those familiar with the underside of my old layout ‘Blea Moor’ may well notice some reuse of weight saving holy plywood!
- Once the basic structure was flat and rigid, further progress could be right way up:
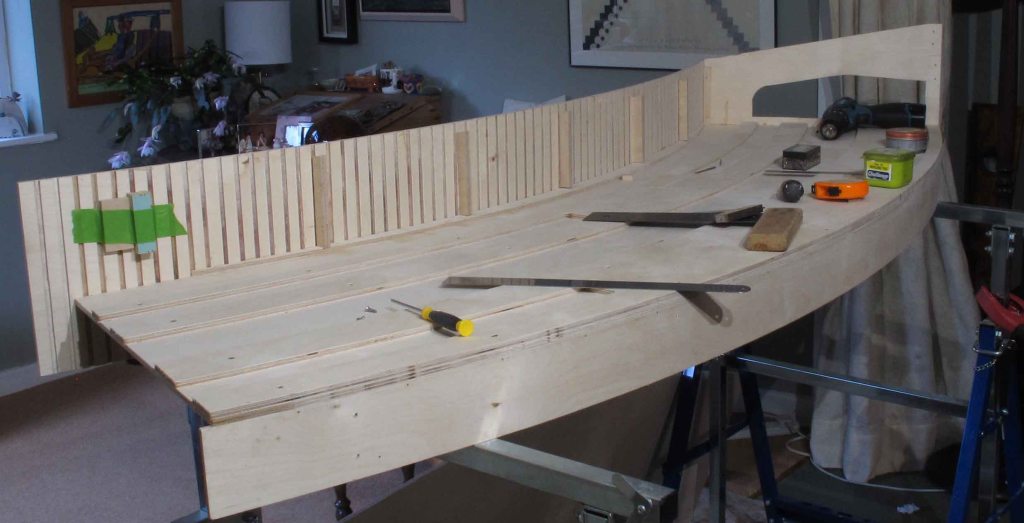
The fascia was added:
Cross beams to support the ‘lid’ and make the whole thing even more rigid:

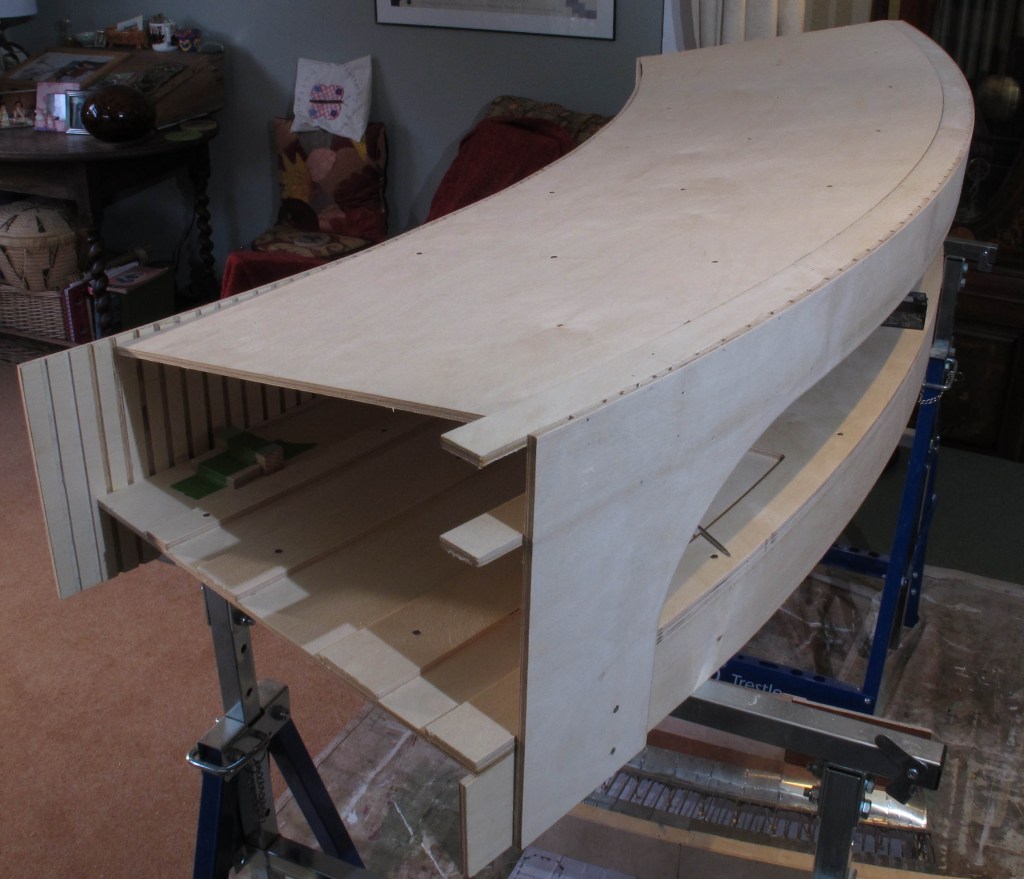
And finally the ‘lid’ fitted. This will protect the etched roof from damage during transporting, keep off the dust and provide a convenient place to mount the lights (LED strip).
- Having discovered with the test section of baseboard that I was not going to be able to cut the curved pieces any where near accurately enough, they have been CNC routed. Laser cutting would have been just as effective but I couldn’t find a local supplier of the birch ply I wanted who also had a laser cutter…….but I could find one with a CNC router!
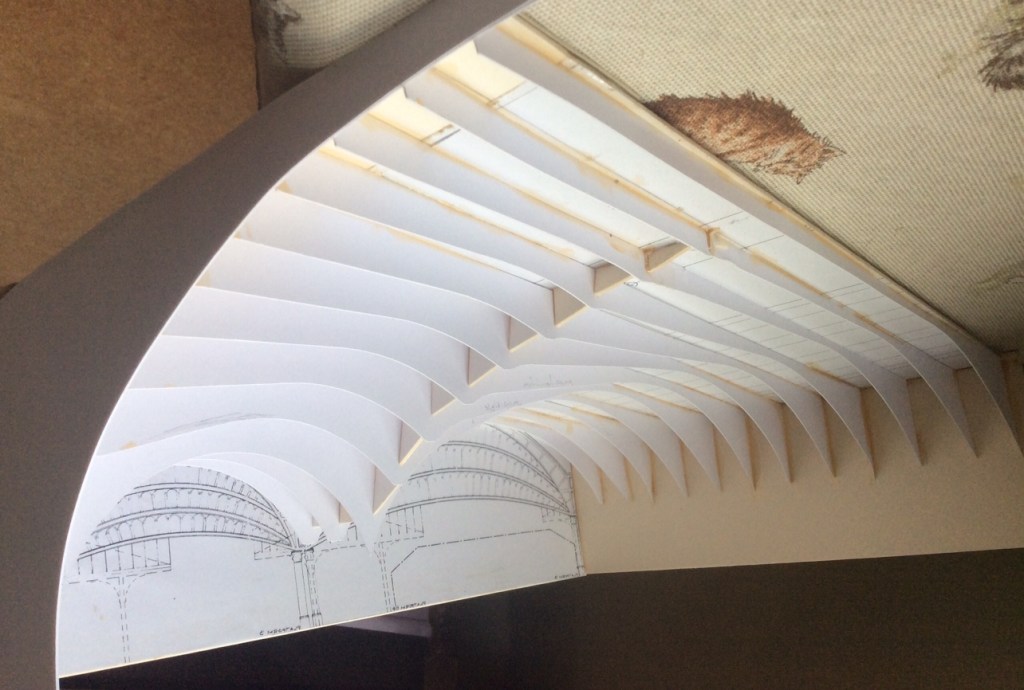
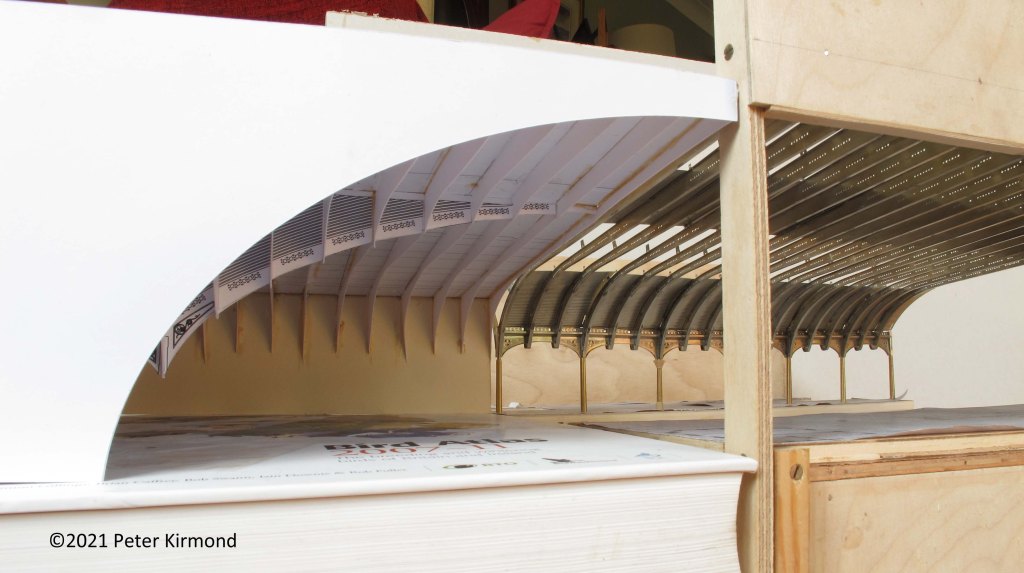
- This does now start to give an idea of what the view will be like:
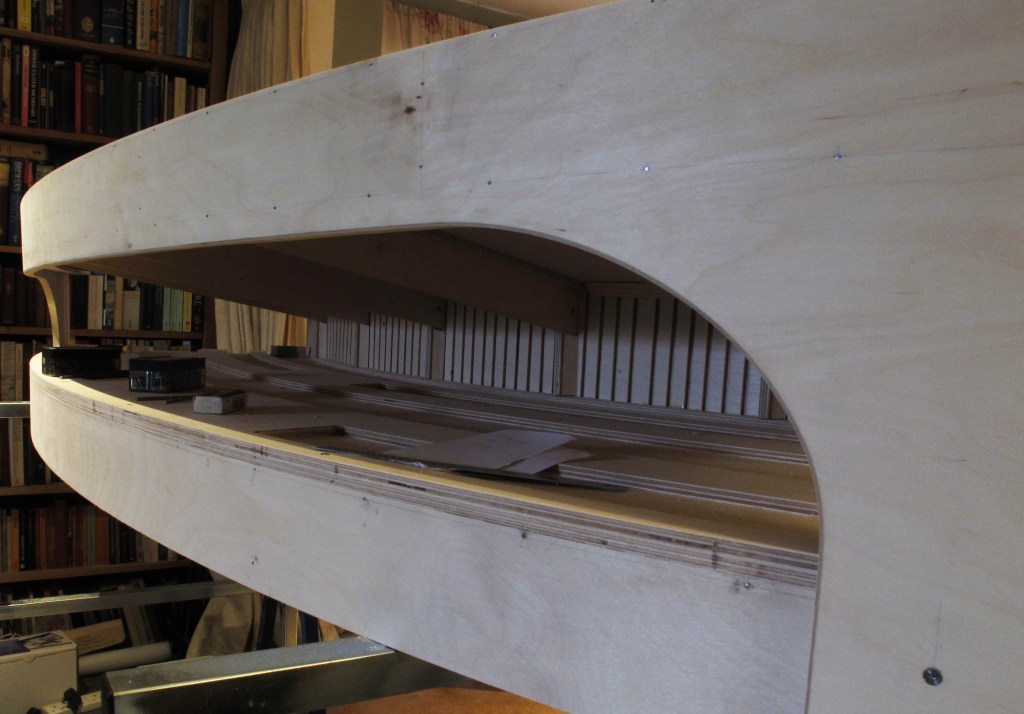
More to follow…….
24th August 2021 (235 days to do)
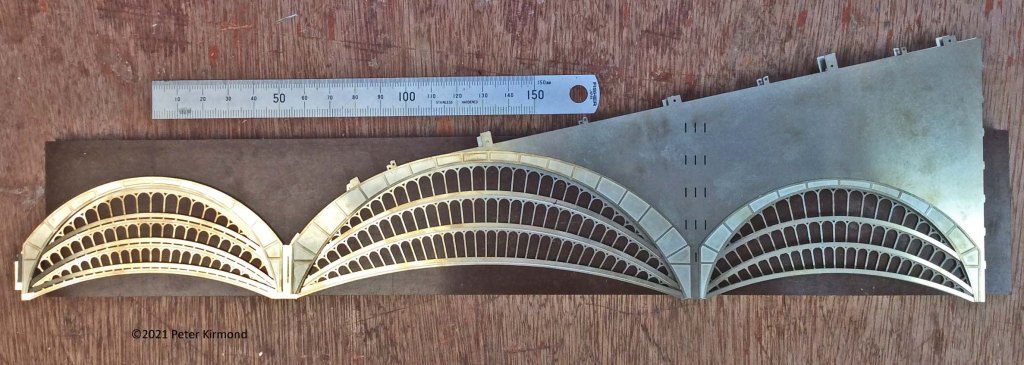
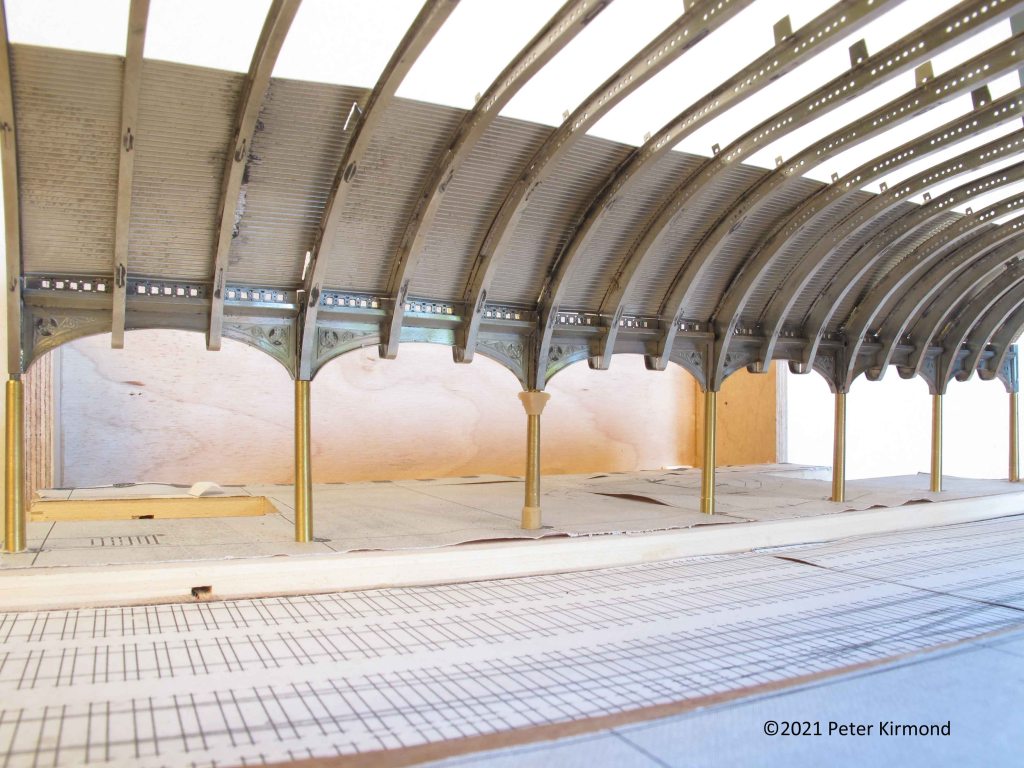
Further progress on roof construction:

Given how complex an etch it is, I was amazed how well it went together with the first test etch: somehow I expected some fairly major errors. But, no, although there were a few mistakes, nothing serious enough to prevent assembly and now I have about a third of the roof completed, seen here on the test section of baseboard, it’s possible to see what it will look like when complete:

The end screens have turned out particularly well:

..and the columns with 3D printed tops and bottoms courtesy of Simon Thompson really set it off. Although the transverse beams as it tapers down are (as seen here) much wider than prototype, when viewed from a normal viewing angle, this is not so obvious:

Next step is a test section of the rear wall to work out how to build that…….
2nd August 2021 (257 days to go)
One of the key things needed for this layout to be convincing is the slow running of the locos. Since virtually all trains will stop in the station, being able to come to a halt and pull away smoothly and seamlessly is very important and for this to happen smooth ultra slow running is needed to get to and from stationary.
The chassis I’ve been building are milled from solid metal and fitted with Association 21:1 gears using a fold up gearbox I’ve drawn and had etched. The thinking behind this relatively low ratio is to produce a simple, single stage gearbox that (hopefully) will run smoothly long term whilst leaving the maximum amount of room in the boiler and firebox for adding weight:

Initially, I tried the original tender fitted Dapol motor. This was ‘not bad’ in terms of its smooth, slow running but not as good as I was hoping for. I have some Maxon RE10 motors so next tried one of those – better but still not ideal.
Then I started thinking laterally: the Big Boys on my American O-scale layout ‘Laramie Engine Terminal’ are driven by 25:1 gearboxes on each 8-coupled engines connected to the motor via a propshaft/universal drive. I have replaced the original massive open framed 9-pole motors (state of the art mid-1960s) with Maxon gearmotors with an in-line 4:1 gearbox giving an overall reduction of about 100:1 which produces amazingly smooth slow running. These are far too big to fit in the Gresley tenders but maybe a smaller gearmotor would do the trick.
Then I remembered the small cheap Chinese gearmotor my good mate Andy Ross (Trams & Locos) had given me to try. He uses these to power his cranes. It fits neatly inside the Gresley tender body with just enought room behind it for a micro DCC chip:


The flywheel at the front helps with smooth running whilst providing a way of connecting the Dapol universal drive yoke to the fairly chunky 3mm output shaft from the gearbox. These gearmotors are available in a variety of voltages and ratios and cost a few pounds each. This one is 12V and gives a maximum speed of 4000RPM so I’m guessing has a ratio of 4 or 5:1 giving a total motor to driving wheel reduction of between 80 and 100:1.
This works BRILLIANTLY – exactly what I was looking for. It does mean the maximum speed of the locos is 25-30MPH but, since the speed limit throught the station in the 1930s was 20MPH, this is not a problem. Also the motor and geartrain is quite noisy once it gets up to speed but, since ‘This is York’ is an exhibition layout, this is also not a problem as it will be inaudible above the hubbub of a show.
So………………..RESULT!
The only snag is these gearmotors are too big to fit in any tender smaller than a Gresley 8-wheeler so another solution will need to be found for those!
31st July 2021 (259 days to go)
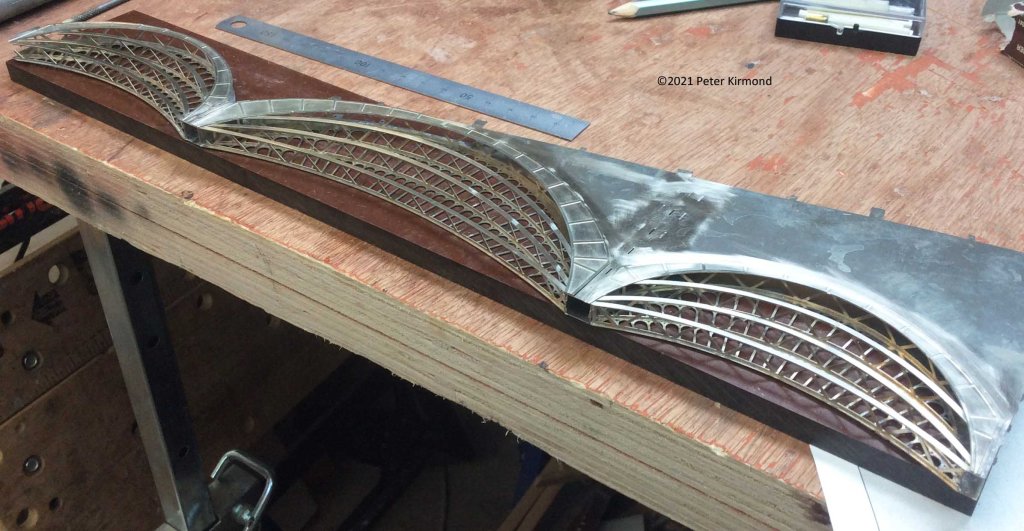
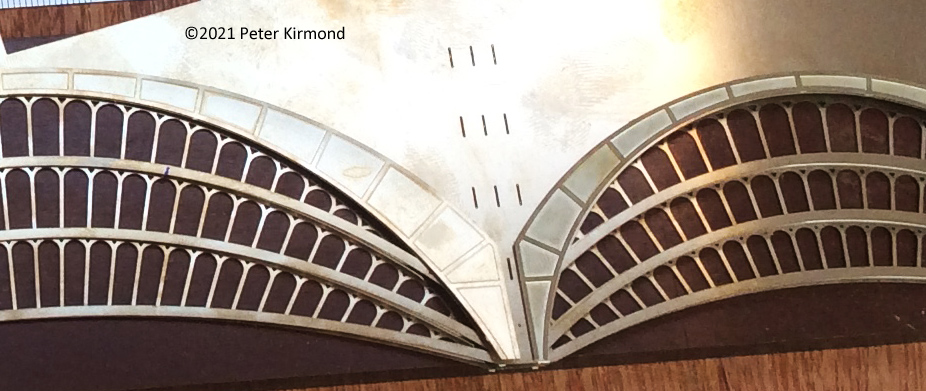
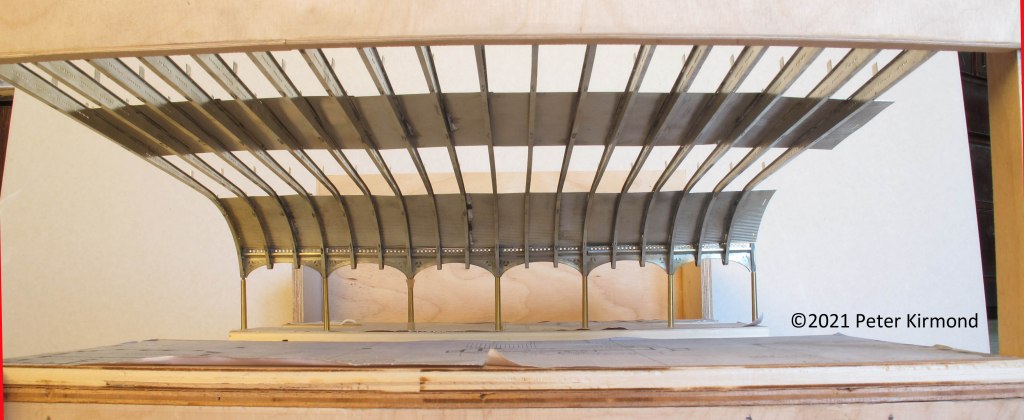
Progress on the roof ends:

The etches have gone together remarkably well – I always expect to come across some idiotic mistake I’ve made which renders the whole lot unbuildable but this time, so far, nothing more than a couple of minor things.
The taper from prototype arch to the ‘peeled open’ which will allow viewing of the interior is starting to become apparent – 5 of the 12 transverse beams that make up the end section so far added:

As a reminder of what this will look like when completed here’s the mock up from approximate the same angle:
I think (hope) the ‘roof taper profile’ has improved quite a bit since the mock up was made.

More to follow……….
22nd July 2021 (268 days to go)
Yesterday’s session in the pre-superheated shed involved carefully rolling the lattice work and soldering it onto the screens:
And then this morning’s was soldering the girder overlays onto the inner arches and fixing that assembly onto the screens/latticework to produce the complet end arches:

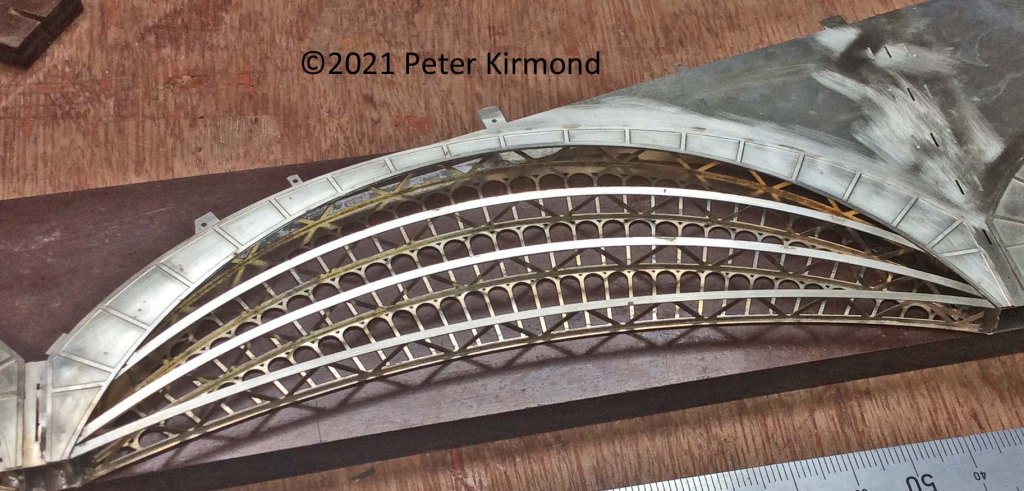
Over the past few months since I said I’d get this layout to a presentable stage by York Show 2022 this undertaking has at times seemed idiotic, insane or simply unachieveable. Seeing these screens take shape has made me think that it might after all be possible and that the whole concept of the layout might just be a good one.
20th July 2021 (270 days to go)
The etches for the ends of the overall roof arrived the other day and this morning, before the shed got too hot to tolerate, I cut the elements of the end screens off the sheet and was very pleased with the result:
As usual with the first iteration of an etch, there are a few mistakes but nothing found so far that will prevent assembly.
There are 3 layers – screen, inner frame and the top girders currently just lying on top of each other to make sure they will fit together (they will!):
The screens will be spaced from the inner frame with a lattice framework and this assembly then becomes part of the end ‘taper’:
and all the metal above the top of the arches becomes part of the rigid structure of the model roof in line with the ‘peeled open’ part of the roof and won’t be visible from a viewing angle (just as it isn’t in the mock up above).
More pictures as construction progresses…….
3rd July 2021 (287 days to go)
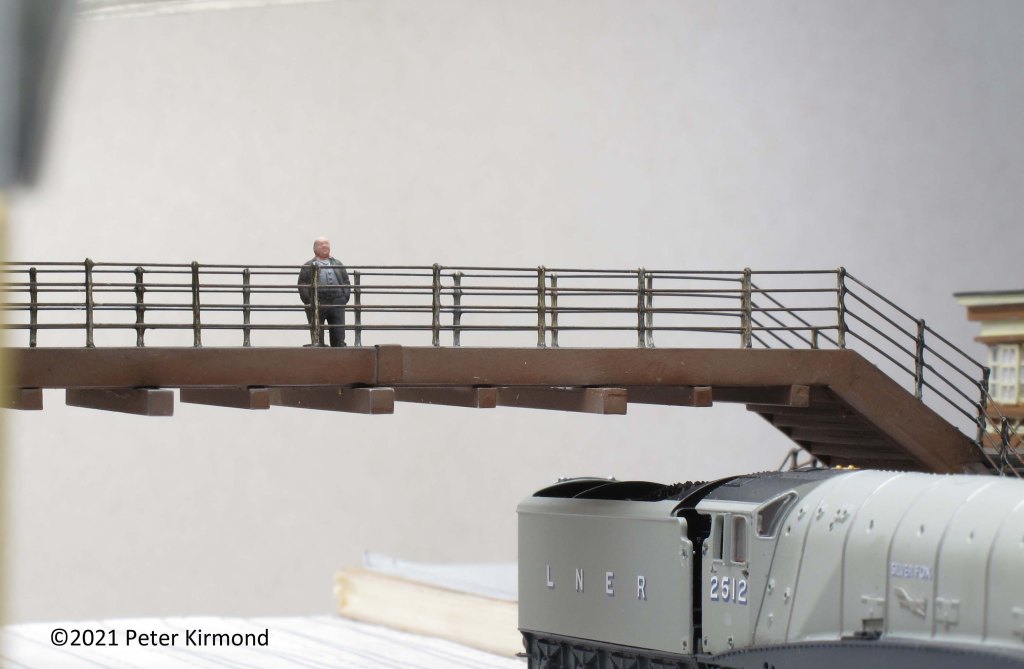
If you’ve been following this thread, you’ll know that Peter Smith (aka Kirtley Models) built me models of the footbridge and signal box. He does a great job for a very reasonable price but, necessarily, his time on any model is limited so I knew I might well want to primp and add more detail. In the end, I’ve done quite a bit:
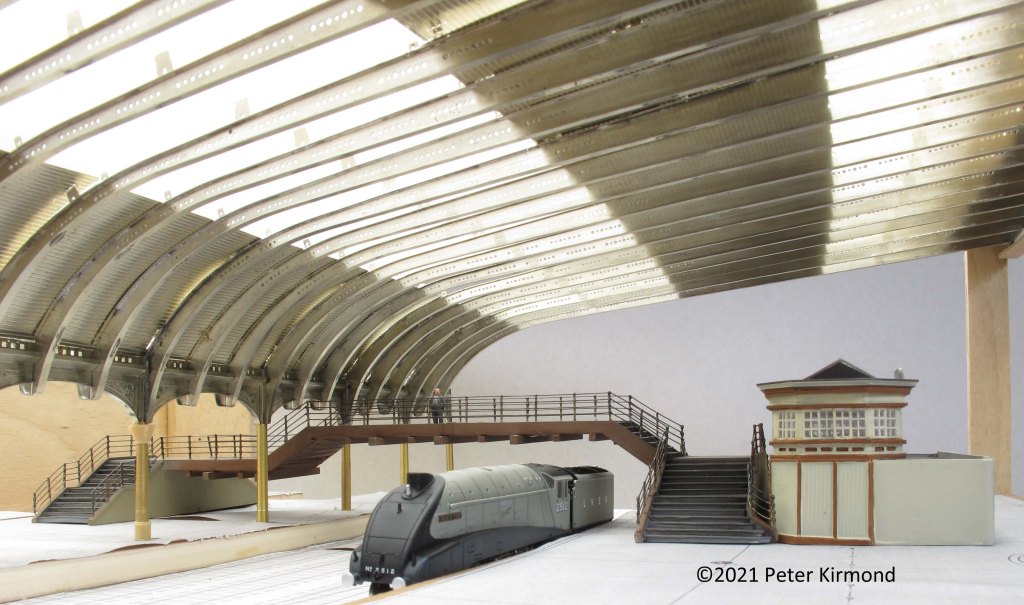
The handrails Peter fitted to the bridge were styrene strip representing wooden rails. Close examination of photos revealed there were actually metal so stanchions were etched and 0.3mm wire used to get a bit closer to the real thing.

Peter did a great job of the signal box (including laser cut windows by York Modelmaking). I’ve improved on his paint job and replaced the ‘false’ skylights he fitted with ‘real’ transparent ones:
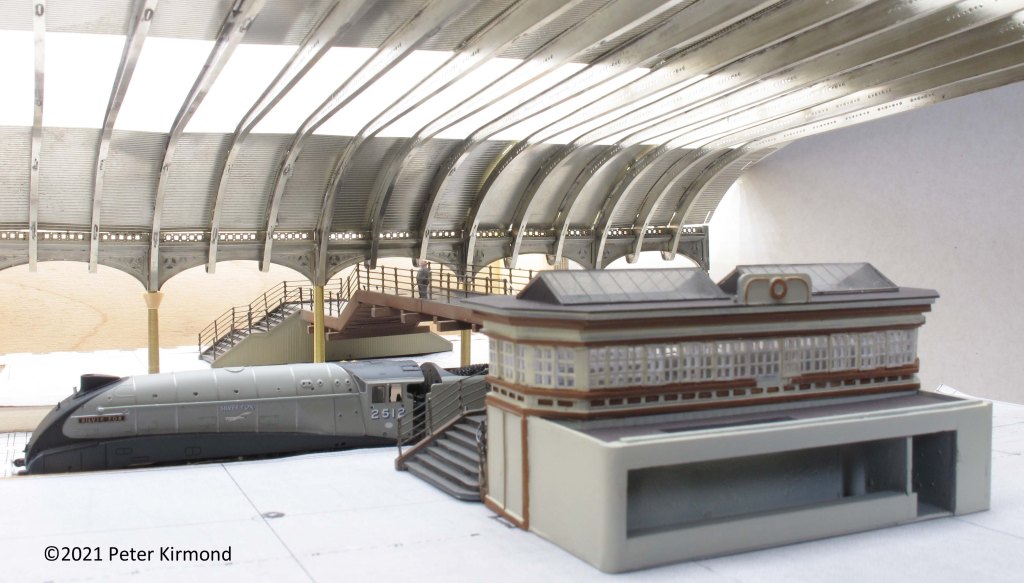
This transforms the light inside the ‘box and makes it well worthwhile (at some point) adding an interior – it will now be visible.
In case you’re wondering, the W.H.Smith’s kiosk is currently being ‘redecorated’ and the clock has been sent away for overhaul.
Hang on a minute: who’s that on the footbridge? It looks rather like Mike Cook. Could it be? You know, I think it just might be!
6th June 2021 (314 days to go)
All these curved arches don’t fit very efficiently on a rectangular sheet of etch so there are lots of spare corners for useful bits and pieces to be placed. One I’m particularly pleased with is the grabrails I’ve done for the rake of Barnum coaches I’m building;
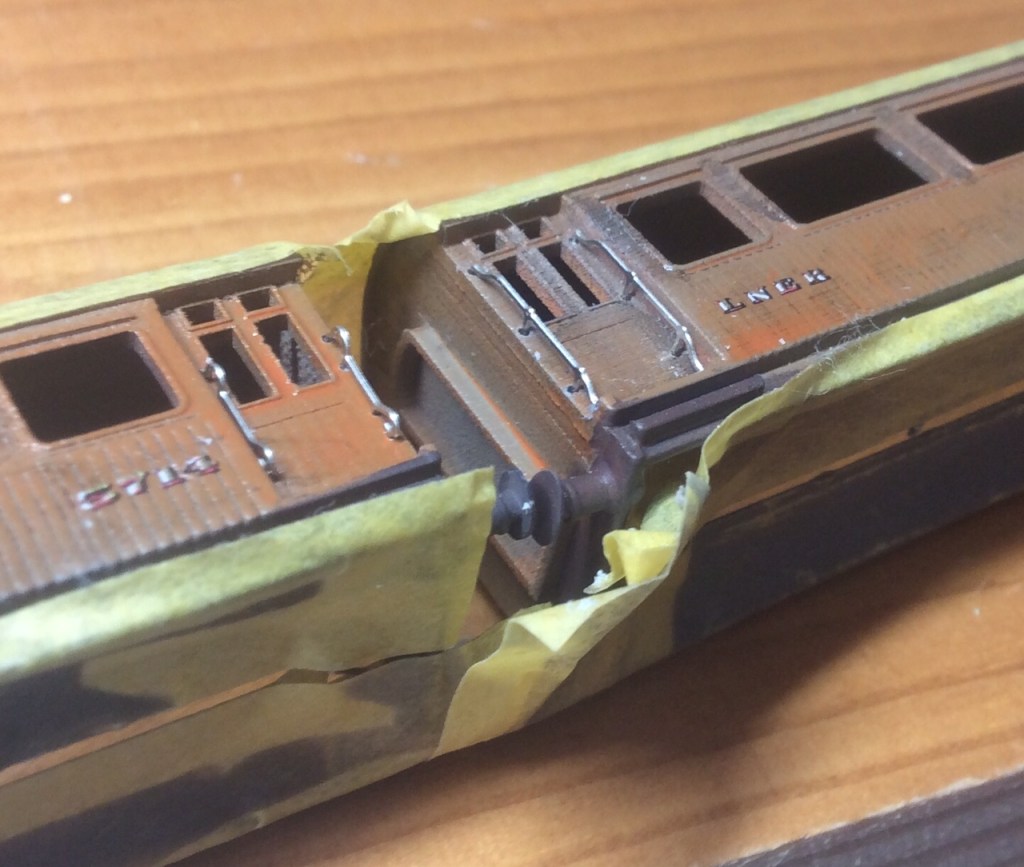
The bodies are 3D prints from Simon Dawson’s Rue d’Etropal ‘store’ on Shapeways. Although Shapeways prints have been criticized by some people, these ones are actually pretty good and although they need a good clean up and some fettling. they are going to make into a very nice excursion train.
I suspect the prototype grabrails were brass rather than chrome or steel so might have been better etched in brass rather than nickel silver but I much prefer N/S as it is so much easier to solder so a coat of brass coloured paint will be needed for the whole etch:
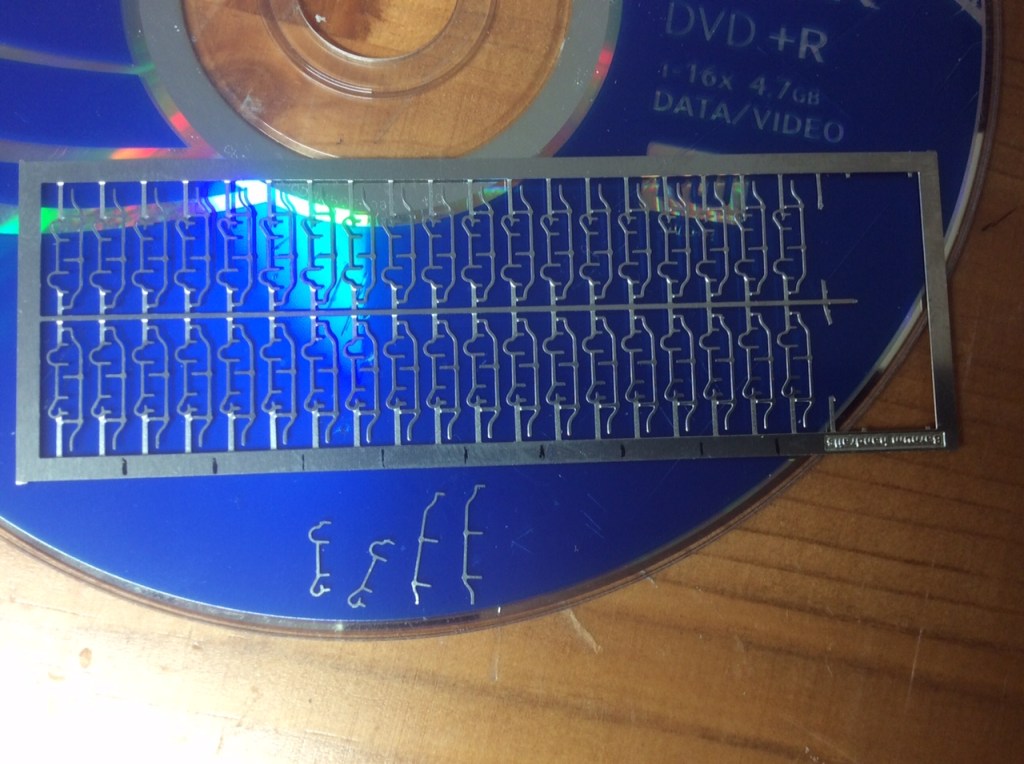
In case anyone is wondering the old unwanted DVD is a very good trick used by military modellers for cutting things off etches. A scalpel blade is used and it scores the disc that would otherwise be destined for the bin without blunting the blade and it’s rigid enough not to give (like a cutting mat would) so the etched component is removed without getting distorted.
Ina larger scale the 2 dimensional nature of the etch would be very obvious but in 2mm getting the intricate scroll shape right convinces the eye.
4th June 2021 (316 days to go)
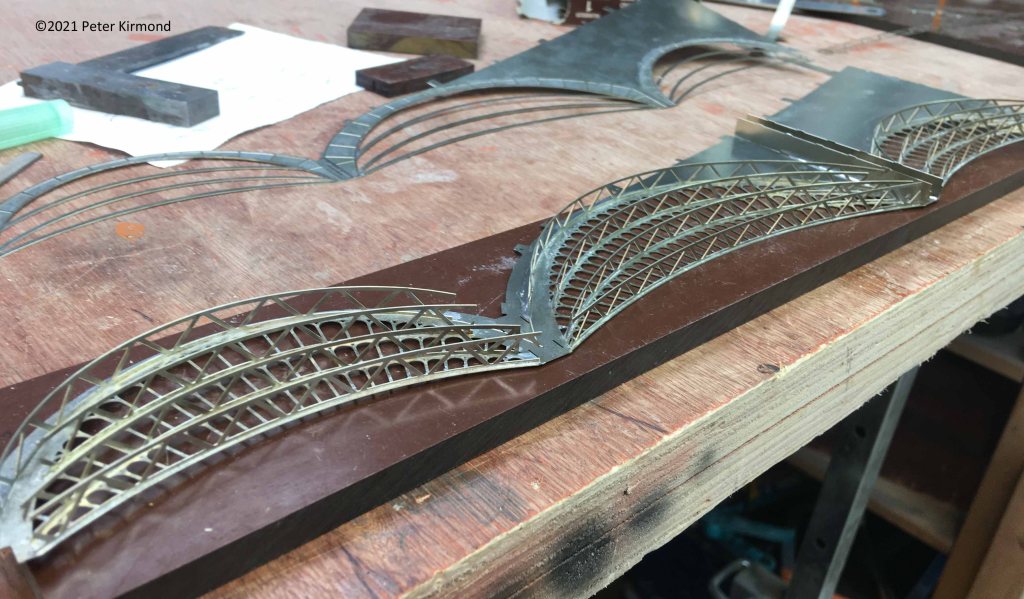
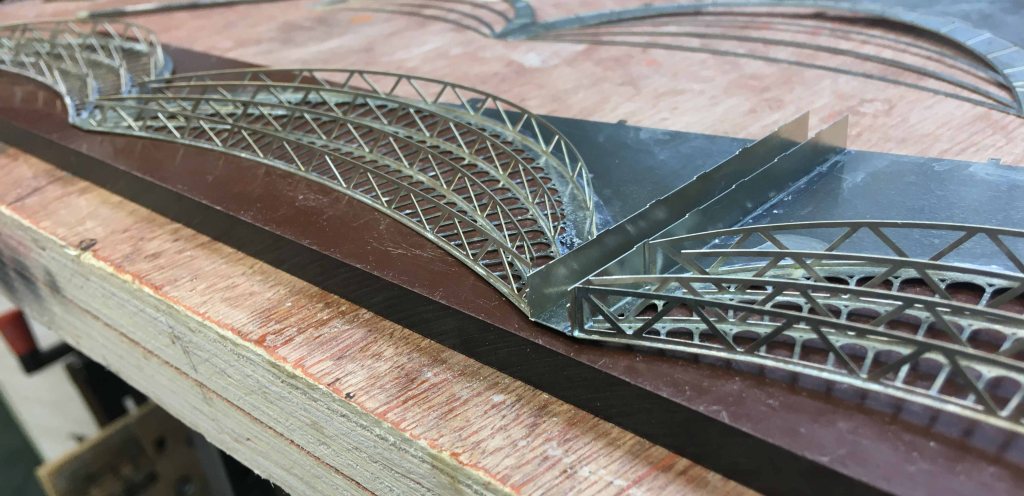
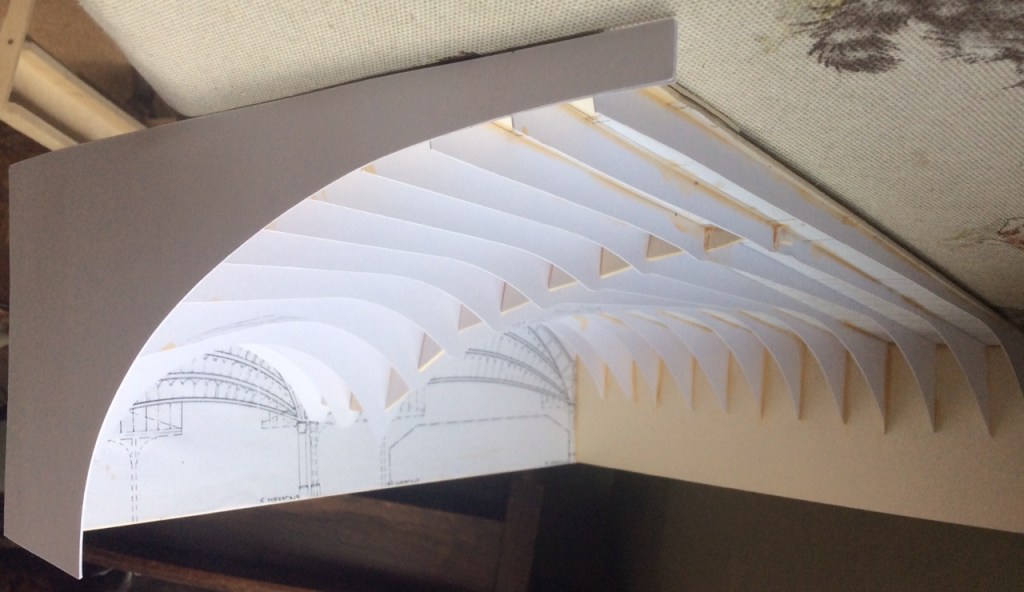
Having cracked the beam design for most of the length of the roof the next challenge has been to design the tapered ends where the roof profile goes from the prototype arches to the ‘peeled open’ profile that enables the inside of the station to be visible.
As a reminder of the idea, here are a couple of photos of the full sized mock up:
Although the pillars seem pretty big when you’re in the station, in fact, they’re only about 16ft tall (32mm in 2mm/ft). I’m keen on the ‘pillar box’ presentation style but this is a bit too narrow! So the roof needs to ‘peel open’ to enable the viewer to see in. For this to work visually it needs to be immediately obvious to the eye what is going on and for this to happen the taper from prototype roof to open roof needs to be a smooth transition – I know this because early versions of the mock up were less than convincing and I think this was because the transition was too abrupt.
Mock up versions of the taper were cut in card on my craft cutter and the profile evolved until I came to something that convinced:
Version 4:

Version 6:
Comparison has been made between this design and the work of contemporary architects like Zaha Habib which is very flattering. I kinda wonder whether they use mathematic formulae to produce the smooth curves of their designs but, not having these, it was a matter of trial and error for me.
The final version (v7 I think) looks pretty good I think when set alongside the test section of roof:
..and is now getting converted into a drawing to send to the etchers.
With 27 columns worth of roof to build and only 4 done so far, there will then be many hours of work with the soldering iron!
1st June 2021 (319 days to go)
It’s been a while since I posted anything here, in fact I was quite shocked to find it’s nearly 2 months. So apologies to anyone hoping for daily updates!
Work has been progressing on ‘This is York’ more slowly than I hoped and with more problems than I anticipated.
Also, life in general has been getting in the way of modelling which has done nothing to speed progress towards the fast approaching deadline of Easter 2021.
This is the first of several posts over the next few days to bring things up to date.
The test build of the roof etch revealed quite a few errors and several possible improvements and an amended version of the artwork was sent to PPD in April. These returned commendably quickly and a second test build has now been completed:
The six columns worth now built starts to give an idea of what it will look like when all 27 are in place.
I was particularly pleased with the lengthways beams with their scroll work:
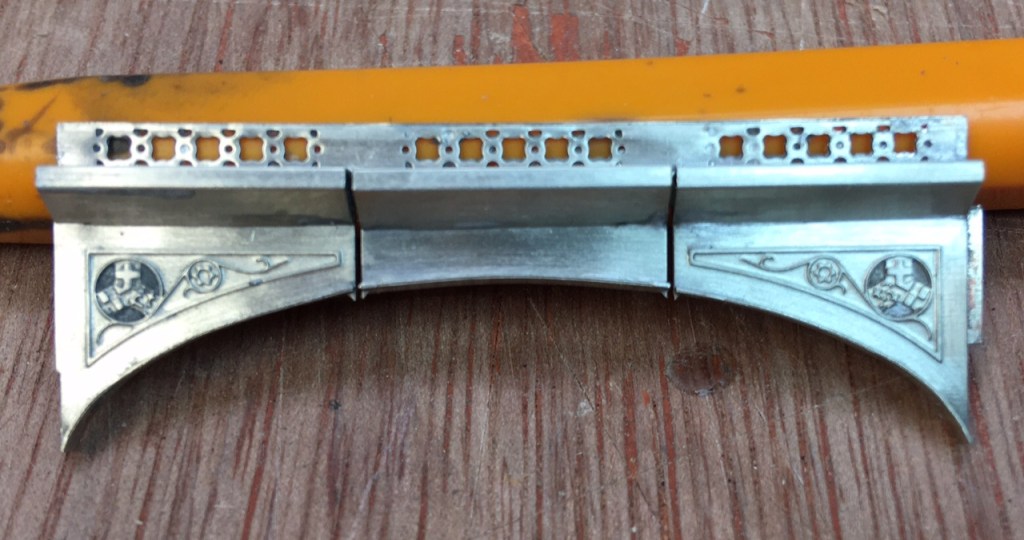
This has had to be simplified somewhat to be (a) etchable and (b) visible in 2mm/ft. This was on the drawing for the first test etch but I messed up the fill so half etched detail got missed off.
Although there were still a few minor errors in this second version, I decided I could live with the small amount of fettling they would need and a repeat batch for the rest of the ‘peeled open’ section of the roof is currently in the etching tank queue. Just the 23 more sections to build!
Next exciting episode = designing the tapered ends of the roof………..
30th March 2021 (381 days to go)
All these coaches are going to need some motive power to pull them. As before, the first targets have to be the easy route of RTR conversions.
Dapol produce really very good N-gauge versions of both the A3 and A4 but the valve gear is a slightly strange combination of over scale width and very flimsy (due to the thin, soft metal used).
After spending quite some time trying to convert one of the Dapol chassis to 2FS I came to the conclusion that this could be done BUT NOT EASILY. So a better route was replacement chassis.
Being aware that pulling power might be an issue with the relatively long trains I am planning, chassis milled from solid seemed a good way to go and I can now report progress so far:
Etched valve gear was going to be needed.
My Mk. 1 version looked OK but, as with most RTR interpretations of Walchaert’s valve gear, it was firmly in neutral.
Cue comments of ‘It would look much better if it was in gear’.
Mk. 2 was in gear and I was very chuffed with it until a friend quietly pointed out that it wasin reverse!
Mk. 3 has now been test built and is, I think, getting there:
https://www.youtube.com/embed/GJv66zBu_uU?feature=oembed
This is the first of a batch of five A1/3s (lighter green livery yet to be applied to this one).
I also have four A4s in various stages of completion:
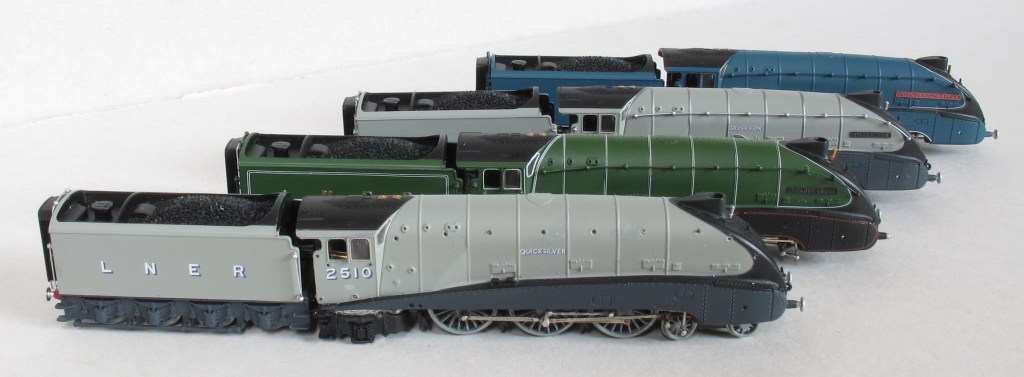
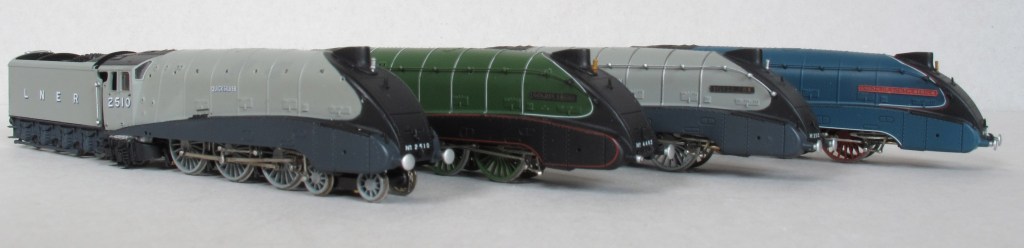
Etches are in the pipline to correct the tender tops, and, no, the valve gear on these ISN’T in gear – in fact, the radius rods and valve rods have been omitted from these as they can’t be seen behind the valence.
16th March 2021 (395 days to go)
More coaching variety for ‘This is York’: this time, Pullmans.
When planning the layout I was disappointed to find that for most of the inter-war years the ECML Pullman trains (Queen of Scots, Yorkshire Pullman) were routed via Leeds rather than York. But then I discovered that, in the late 30s, the Harrogate portion of the latter went via York and joined up with the other bits at Doncaster.
But how to model Pullman coaches well in 2mm/N-gauge? Light bulb moment (thanks to John Aldrick) – the all steel Brighton Belle coaches were to the same basic design as the ECML ones and Hornby/Arnold produce a VERY good BB model.
Addition of more underframe detail – the 3rd rail BB didn’t need battery boxes, dynamos etc. – results in something that, I think, really looks the part:

Although the Arnold models are far from cheap they are superb quality. The only snag is the Brighton Belle had driving and trailing cars rather than brake vans. Eventually I realised that a bit of good, old fashioned butchery was needed: the driving and trailing cars were the same basic design as the brake vans but with a cab end.
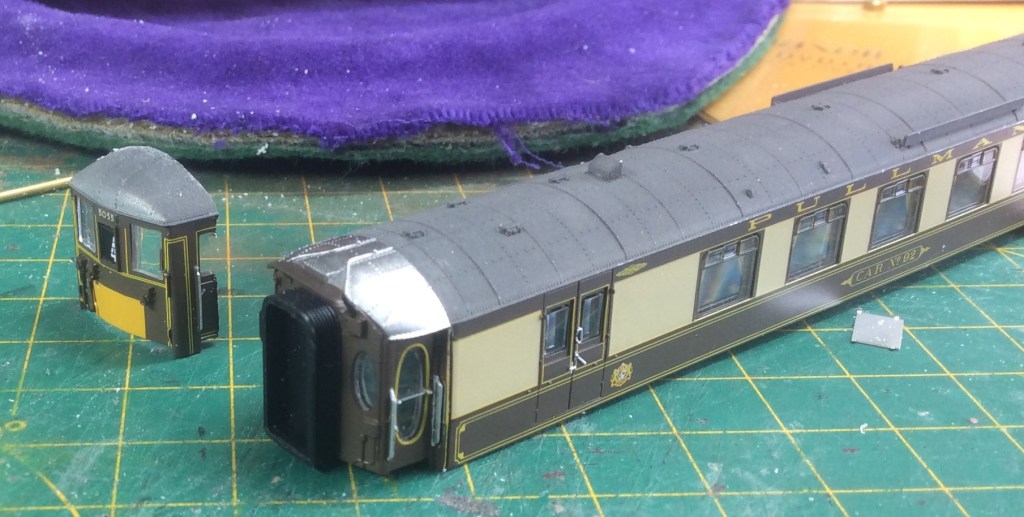
Carefully sawing off the cab of the trailing car and the end of a ‘sacrificial’ coach, some gentle filing and gluing and the result is pretty good. This may seem brutal (and expensive) but only one brake van is needed for the 5 car Harrogate – Doncaster set and the powered driving car was sold on to offset the cost. Also, how else was I going to get a brake van that didn’t stick out like a sore thumb compared to the other coaches?

This set may not be entirely 100% accurate – for example both 3rd class coaches are saloons with no kitchen so 3rd class passengers would have a long wait for lunch.
At some point I’ll get some custom decals done to correct the 1st class car names (and the duplicate 3rd class car numbers!) but, overall, I reckon this is a pretty presentable Pullman train.
All I need now is a D20 to pull them………

1st March 2021 (409 days to go)
The test section of roof (and test section of baseboard for it to sit on) has made progress:
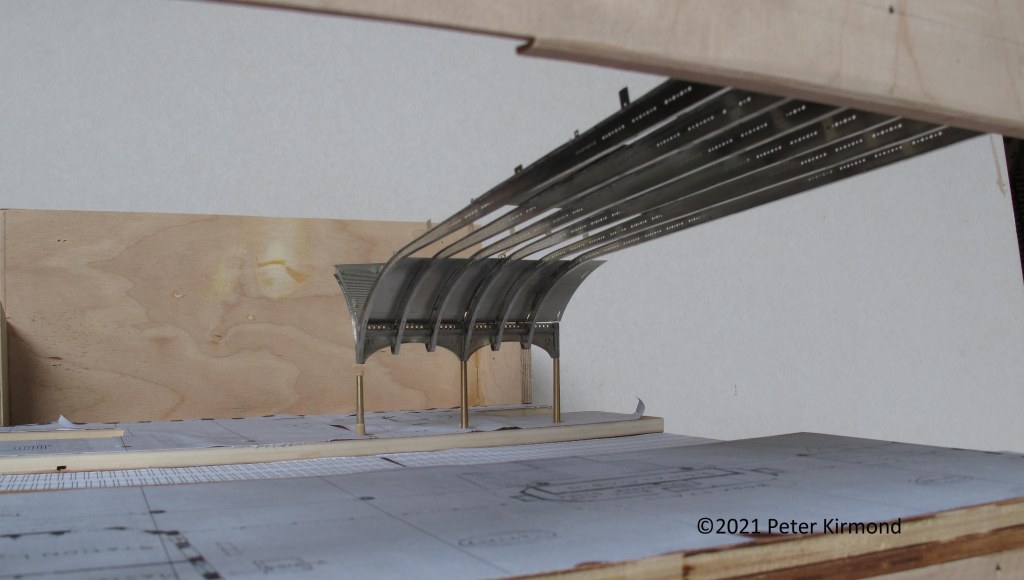
This is part of the ‘peeled open’ part of the roof, so the left hand side of this photo of the full sized mock up:
Of the 27 columns worth of roof to build 18 are these fully peeled open ones so they seemed the sensible place to start.
I’ve divided the roof up into units of three cross beams – one with a pillar and two intermediate ones – these slot together out of sight and are held in place next to each other with split pins:
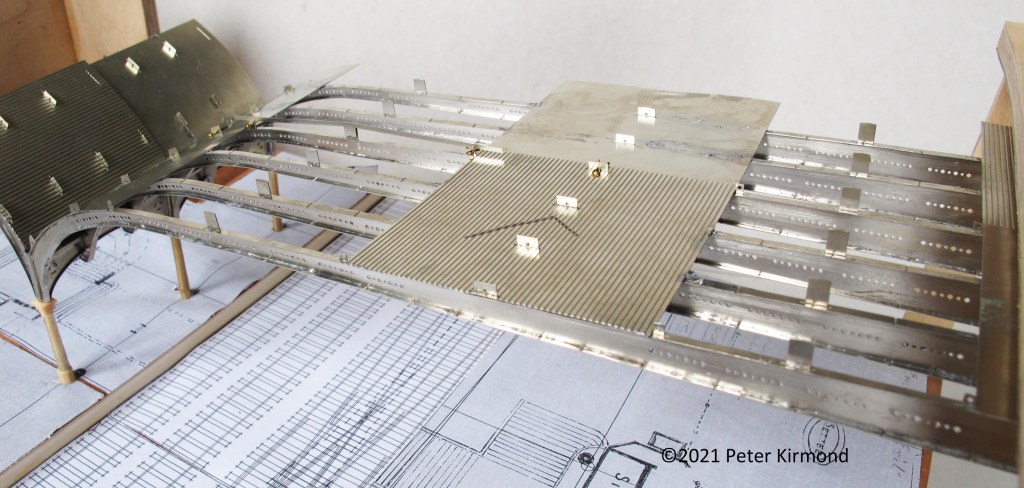
The front edge slots onto a ledge at the bottom of the fascia and is wedged in place with a piece of suitable sized Evergreen strip:
This means the whole thing is firmly held but with room for expansion/contraction as temperatures change.
I wasn’t anticipating this first test etch would be error free….and it wasn’t! Amongst other things, the half etched planking on the roof covering wasn’t always on the correct side and the company plaque and serpent like scroll detail on the beams between the pillars that I’d carefully drawn didn’t make it onto the etch at all. But the good news is all that detail is still there on the drawing so will be there next time. More to the point the method of it all fitting together works really well:
as do the tapered columns with 3D printed details top and bottom.
The arches over the tracks at the back of the station will not be fully visible once the whole roof is in place so I’ve only modelled the two ends that will be seen – a test section of the rear wall for the other end of the arches to sit on is the next job.
20th February 2021 (417 days to go)
Coaches really need passengers: even in 2mm their absence is obvious and their presence definitely adds something. With over 100 coaches to build for this project, populating them could be a daunting task – even if there’s only a figure at most window well over a thousand figures will be needed!
Enter the recent Model Railway Journal article by Alan Webber on building a Gresley quadart populated with 2D paper people printed on his home printer. I got in touch with Keith and he as very kindly shared his artwork with me. Here’s the first ‘occupied’ coach:

There are 2 people per compartment so 16 in total. Cutting out and glueing them in took about an hour with VERY favourable results. I can’t see myself painting 16 people in an hour so a huge amount of time will be saved and a considerable cost saving – well over 200 figures will fit on a single sheet of A4.
So….thank you Alan. I gather he is hoping to make his artwork commercially available via download soon.
11th February 2021 (426 days to go)
Quite an exciting day for ‘THIS IS YORK’ – the first test etches for the roof beams have arrived:
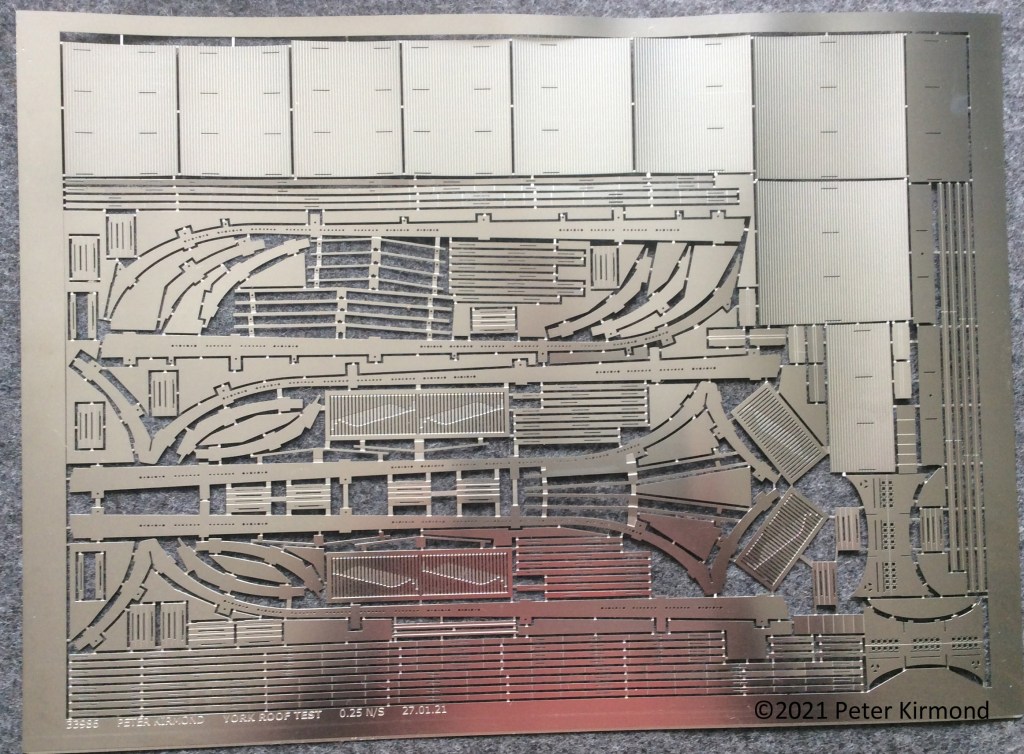
I love getting a new sheet of etches – having spent hours drawing it up, sent it off, and then waited, suddenly, and slightly magically, there it all is crisp, shiny and jewel like.
Usually, with me at least, there are some errors and today’s sheet is no exception. So far, I haven’t spotted any serious ones and, anyway, I was expecting to have to do a couple of test etches to get these beams right – they are quite complicated and, as can be seen, not the easiest to fit onto a rectangular sheet.
The aim with this first test was to establish proof of method and correct any errors. Then, in theory at least, a second test etch before sending a bulk order for the whole of the rest of the roof.
Photos of test build to follow!
9th February 2021 (428 days to go)
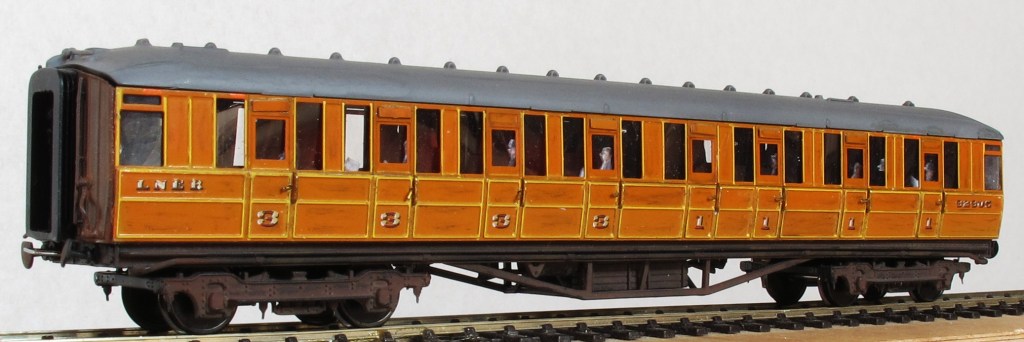
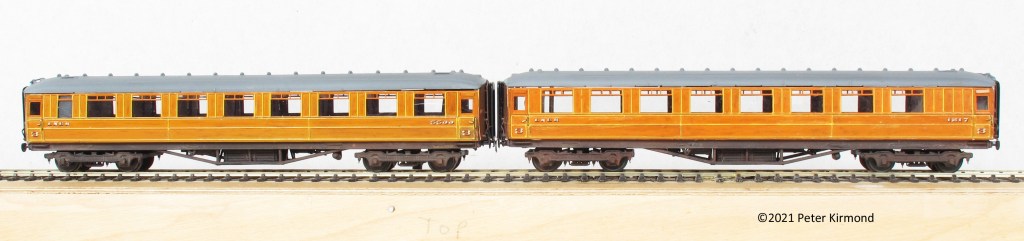
More from the recently completed batch of Gresley coaches – all Dapol fitted with Chris Higgs’ Masterpiece Models etched sides:

A pair of D155 corridor thirds destined for the Flying Scotsman set.
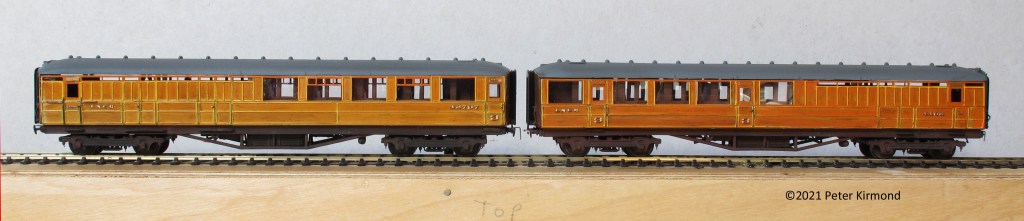
A pair of D27A open thirds.

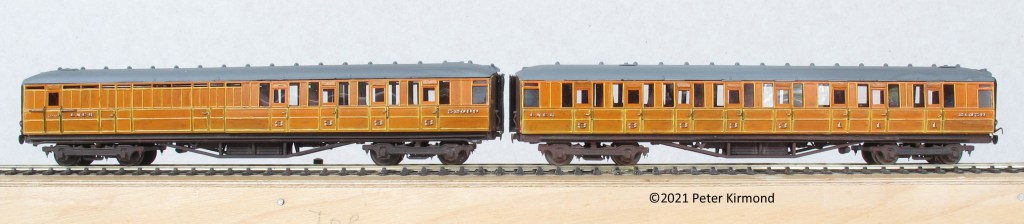
Two D130 composites.
A couple of brake thirds (D212 & D37A)
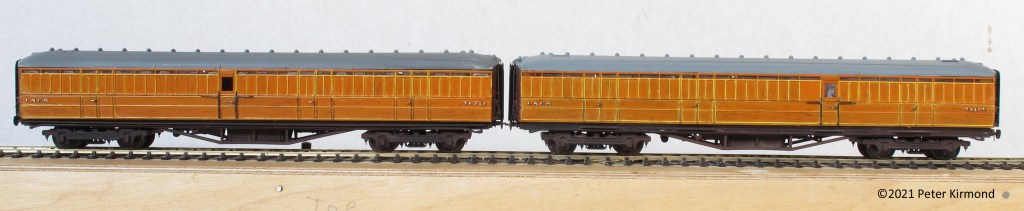
And, finally, a two full brakes (D43 & D113). These last should be riding on Fox bogies and will be when I get round to building some!
I’m pretty pleased with the teak finish I’ve managed to get with these – could perhaps do with being a little darker (though they aren’t quite as pale as these photos show) and definitely could do with more variety of shade both between panels and coaches.
I very much realise these are the ‘low hanging fruit’ – the next 30 coaches will be much harder work being mostly pre-grouping so will either be etched kits shot down from 4mm or drawn for etching myself.
Next on the agenda some locos to pull them……
27th January 2021 (441 days to go)
Two of a batch of 17 Gresley coaches I’ve just finished – Brake 3rd D114 & Composite D137 – built using Chris Higgs’ Masterpiece Models replacement sides. This process has taught me 2 things:
- Building coaches using replacement sides is definitely quicker than building complete coaches
- Whilst batch building saves time, a batch of 17 is FAR too big – at virtually every stage I reached a point (around coach 6 or 7) when the will to continue started to fade!
6th January 2021 (462 days to go)
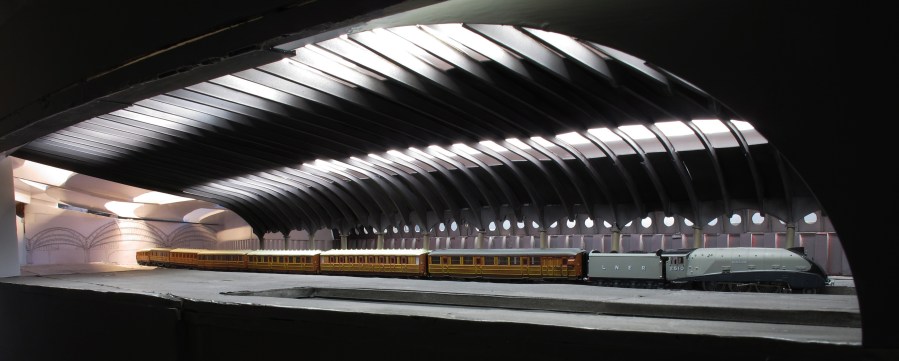
Here are a couple more pictures of the mock up:
As you say, the roof is as in real life at either end and peeling up in between to enable a view in (the pillars are only 15ft tall so a viewing window through those would be a little too narrow in 2mm). The taper down from the open middle to the ends is not quite right on the mock up (and this is about the 3rd attempt) but, once I’ve nailed it, it should be immediately apparent to the viewer what’s going on.
I’ve only built about 1/3rd of the roof beams for the mock up – enough to satisfy me that the idea works. These were cut from plastikard with a craft cutter but for the actual model will be etched – much stronger and better detailed.
The similarity with modern architecture isn’t something I’d thought of but I’ll take a comparison with of Zaha Hadid’s work any day!
Here’s a plan of what’s being modelled laid over a plan of the real roof:
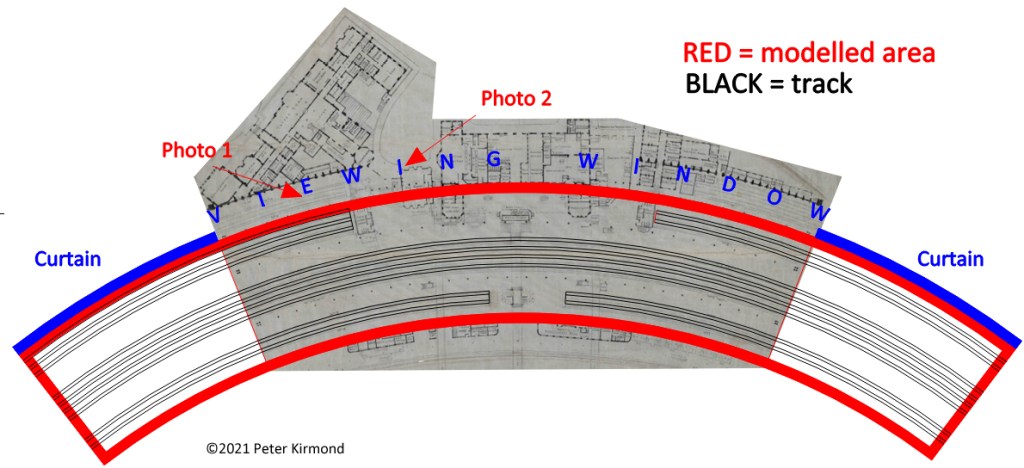
The ‘viewing window’ is the length of the overall roof and the ‘open air’ parts of the platforms either side will be seen only through the arched ends of the roof. Baseboards will be high (as on Laramie) – about 54″ so you’ll be looking in rather than down (I’ll carry a periscope – as I do with Laramie – for anyone who finds this difficult height wise).
The footbridge and signal box will definitely be modelled and the hotel and foyer area definitely won’t. I’m tending to think I won’t model the parts of the entrance building on either side of the footbridge as they would block the view. Likewise the columns between the outer 2 arches won’t be there though I may end up representing both of these in outline on the platform surface – not sure yet.
5th January 2021 (463 days to go)
HAPPY NEW YEAR!
At a time when we are returning to Lockdown I think we all need things to look forward to so I’m making my latest project public on here in the hope that it might interest, entertain or even amuse a few people.
To put it in a nutshell I’m building a 2mm finescale exhibition layout of York Station which will make its first public appearance at York Show Easter 2022.
Regular attenders at exhibitions over the last 15 years or so may well have come across my previous layouts:

and, up until about a year ago and back at exhibitions again soon, Laramie Engine Terminal – 1950s Union Pacific in American O scale:
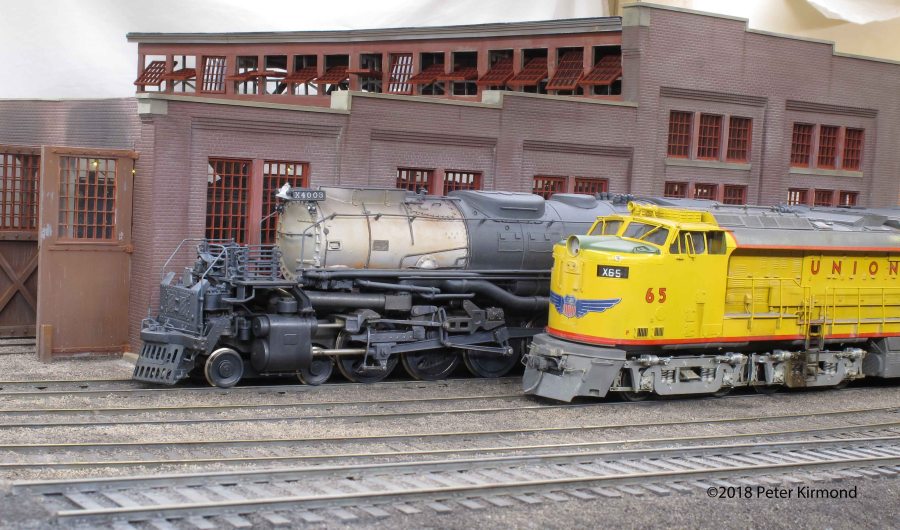
The new layout (provisionally named ‘This is York’) will take design elements from both these layouts to present the view from the INSIDE of the overall roof of York Station during the LNER days of the 1930s:
So far a full sized mock up has been built (photo above), the fiddle yard is built and working, some stock is built and much more is part built.
More will follow………
